
Learn a proven, step-by-step way to document, negotiate, and protect your insurance claim, avoid denials, and stay ready for smarter, AI-driven claims.
Why this guide matters right now
Insurance is supposed to feel reliable. Yet the claims moment can feel chaotic, emotional, and unfair. A leak, a crash, a theft, a storm, or a medical bill can quickly turn into paperwork, deadlines, confusing calls, and stressful back-and-forth.
That stress is not accidental. Claims are complex by design. Policies use strict definitions. Forms have hard timelines. Small mistakes can shrink payouts. Even honest people lose money due to weak documentation, vague wording, or missed steps.
However, you can flip the power dynamic. You do not need to be aggressive. You need to be organized, calm, and precise. Strong claims are built like cases. Great claims feel boring to the insurer because the facts are clean.
This guide gives you a practical, beginner-friendly system. It is designed to be fast when life is messy. It is also built for the future, because claim handling is changing. More automation, more data, and more model-driven decisions are coming.

Understanding the claim game without paranoia
A claim is a request for the insurer to pay under the contract. The insurer will evaluate three core questions.
What happened, exactly
Facts matter more than feelings. Date, time, place, and cause are the spine of the claim. Ambiguity creates delays. Confusion creates denials.
What is covered, and what is excluded
Coverage is not “good” or “bad.” It is specific. Policies pay for defined events, defined property, and defined losses. Exclusions and limits are equally real.
How much is owed under the policy terms
The payout is not only about damage. It is also about valuation rules, depreciation, deductibles, sub-limits, and documentation. Consequently, two people with the same loss can get very different results.
Step 0: Build your claim-ready foundation before anything happens
This step is powerful because it is calm. It saves you when you are tired later.
Create a “one-page insurance map”
Make one page with policy numbers, insurer contacts, agent contacts, claim hotline, and renewal dates. Additionally, note deductible amounts and key limits if you know them.
Keep it on your phone and email it to yourself. Store it in cloud storage too.
Build a simple home or property inventory
A basic inventory is a massive advantage. You can do it in one hour. Walk room by room and record a slow video. Open drawers. Show model numbers. Capture high-value items.
Moreover, save receipts for big purchases. If receipts are gone, keep bank statements or order confirmations.
Keep an “evidence kit” folder
Make a folder that holds photos of IDs, ownership documents, pet records, and medical summaries if relevant. Similarly, store warranties, appraisals, and serial numbers.
Learn your policy language in 20 minutes
You do not need to read every word. Focus on these terms: deductible, limit, sub-limit, exclusion, endorsement, actual cash value, replacement cost, loss of use, additional living expense, appraisal clause, and proof of loss.
That quick literacy is a proven confidence boost.
Step 1: The first 24 hours after a loss
The first day is emotional and urgent. Your goal is safety first, then clean evidence, then controlled communication.
Secure safety and stop additional damage
If there is active danger, prioritize life and safety. After that, take reasonable steps to prevent further damage. This is often required under policy conditions.
For example, shut off water if a pipe bursts. Cover a roof opening with a tarp if safe. Move items away from soaked areas.
Importantly, keep receipts for emergency spending. Those receipts can become reimbursable evidence.
Capture evidence before cleanup
Before you throw anything away, document it. Take wide shots first. Then take close-ups. Photograph serial numbers. Film a slow video walkthrough.
Also capture “context photos.” Show the room, the item, and the damage in one sequence. That creates a vivid, reliable record.
Start a simple timeline immediately
Write a timeline in your notes app. Use short entries: what happened, when you noticed it, what you did, who you called, and what they said.
This timeline becomes your memory shield. It is a crucial tool later.
Step 2: Open the claim the smart way
Opening a claim sounds simple. Yet the first call can shape everything.
Choose your words with calm precision
Use factual language. Avoid guessing cause if you are unsure. If you do not know, say you do not know.
If asked for details, answer clearly. Keep it short. Stay consistent with your timeline.
Ask for the claim number and next steps
Always get a claim number. Ask what documents they want, what the deadlines are, and how the adjuster will contact you. Furthermore, ask what communication channel is best for written follow-up.
Confirm everything in writing
After the call, send a short email that restates key facts. Include date, claim number, and what was agreed.
That email is a quiet but powerful protection.
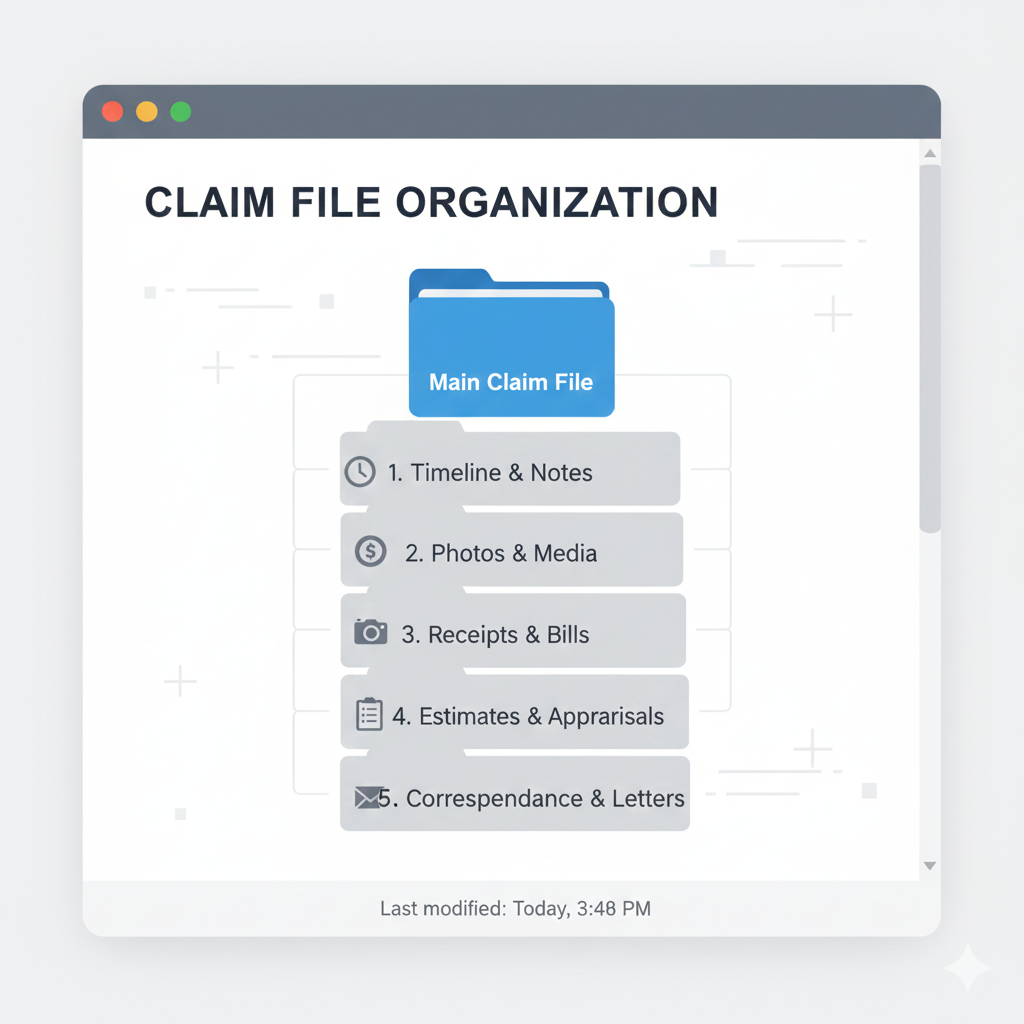
Step 3: Build your “claim file” like a professional
This step is where you win. A strong claim file makes you credible. It also makes denials harder.
The four pillars of an unbeatable claim file
A great claim file is built on four categories.
First, proof of event. This includes photos, videos, police reports, weather records, and incident details.
Second, proof of ownership. Receipts, invoices, serial numbers, bank statements, and warranty cards.
Third, proof of damage and scope. Before photos, after photos, repair estimates, and itemized lists.
Fourth, proof of costs and impact. Temporary housing receipts, rental car bills, medical bills, and time-sensitive expenses.
Additionally, keep a call log with dates, names, and summaries. It is simple. It is also devastatingly effective.
How to photograph damage so it is “adjuster-friendly”
Take three layers of photos.
Start with wide photos that show the entire area. Then shoot medium photos that show the damaged section. Finally, take close-ups that show texture, cracks, water lines, or burns.
Include one photo with a measuring tape or common object for scale. Similarly, photograph any relevant labels.
How to write item lists that do not get “trimmed”
If you list items vaguely, insurers can undervalue them. Be specific.
Instead of “TV,” write “55-inch Samsung QLED, model QN55…, purchased 2022.” Instead of “sofa,” write “3-seat sectional, fabric, brand, approximate dimensions, purchase month, and price.”
This detail is not overkill. It is a profitable habit.
Step 4: Get a fair repair scope and estimate
Many claims fail in the scope phase. The insurer may not “see” every necessary line item. Sometimes it is oversight. Sometimes it is strict policy interpretation. Either way, you must make scope visible.
Understand the difference between scope and price
Scope is what needs to be done. Price is what it costs.
If the scope is wrong, even a fair price will be useless. Consequently, you must protect scope first.
Get your own estimate, even if you trust the insurer
Having your own estimate is leverage. It creates a second viewpoint. It also helps you catch missing items.
Ask your contractor to provide an itemized estimate. Request clear notes that explain why each step is needed.
Watch for “silent gaps” in common losses
In property claims, gaps often appear in debris removal, code upgrades, matching materials, drying, mold prevention, and hidden damage behind walls.
In auto claims, gaps often appear in diminished value, calibration of sensors, OEM parts versus aftermarket parts, and rental duration.
In health claims, gaps often appear in coding errors, prior authorization issues, and missing documentation.
You do not need to fight on every point. You do need to notice the missing ones.
Step 5: Master the adjuster interaction without drama
Adjusters are not your enemy. Yet they are not your advocate either. Your goal is productive clarity.
Prepare for the inspection like a calm briefing
Before the inspection, print your item list and damage summary. Then walk the adjuster through the loss in a logical order. Keep it factual. Keep it focused.
Also show your best photos early. Photos from day one can be decisive.
Ask direct, respectful questions
Ask what they are including in scope, what they are excluding, and why. Moreover, ask about timelines for the written estimate and payment steps.
If something is missing, ask how to submit additional documentation.
Follow up with a short recap email
After the inspection, send a summary email. Restate what was observed. Include any agreed next steps. This creates a verified trail.
That trail is a crucial safeguard in disputed claims.
A short learning boost early in the process
The claims process feels mysterious until you see it explained cleanly.
[YouTube Video]: A clear consumer-focused breakdown of what to do after a loss, how to document, and how to protect your claim file.
Now, let’s go deeper into the step that scares people most: paperwork deadlines and denials.
Step 6: Proof of loss, deadlines, and the “paperwork trap”
Many policyholders lose money because they miss deadlines or submit weak forms.
What “proof of loss” usually means
Proof of loss is a formal statement describing what happened and what you are claiming. It often requires signatures and sworn details.
Sometimes it is requested. Sometimes it is required by the policy. Sometimes it is required for special programs.
Treat it as a critical document, not a casual form.
A practical way to avoid deadline disasters
Create a “deadline dashboard” in your notes. List every deadline you are given. Add reminders. Include the name of the person who gave the deadline.
If you need more time, request it in writing early. Do not wait until the last day. Meanwhile, keep submitting partial documentation as you gather it.
Use “document bundles” instead of random files
Instead of sending random photos, send a bundle. One email can include: a short cover note, a timeline, a photo index, and key receipts.
This makes you look organized and credible. It also reduces processing errors.
Step 7: How to negotiate without sounding hostile
Negotiation is normal. It is not immoral. It is part of the process.
Start with curiosity, not accusation
If the insurer’s estimate is low, ask how it was calculated. Ask what assumptions were used. Ask why a line item was omitted.
Then bring your evidence. Calm evidence is persuasive. Angry claims are easier to dismiss.
Use “difference tables” in plain language
You do not need fancy spreadsheets. Write a simple comparison:
Your estimate includes drying equipment for five days. The insurer estimate includes none. Here are photos of water saturation and the contractor note.
That style is simple. It is also powerful.
Ask for reconsideration in writing
Ask for a written reevaluation. Attach your contractor documents. Include photos. Keep the tone professional.
Additionally, ask what additional evidence would change their decision. This forces clarity.
Step 8: Avoid the most common denial triggers
Denials often come from predictable issues. You can prevent many of them.
Inconsistent stories
If your story changes, the file looks suspicious. Use your timeline so you stay consistent.
Late reporting
Delays can raise questions. Even if you are unsure, report early and clarify details later.
Missing maintenance context
Some losses look like gradual wear. If your loss is sudden, document sudden signs. For example, show the fresh break, fresh water line, or sudden impact evidence.
Poor item descriptions
Vague item lists lead to low valuations. Specific descriptions protect value.
Unclear causation
If you do not know the cause, do not guess. Instead, report what you observed and what happened.
Step 9: What to do if the claim stalls or feels unfair
Stalling is frustrating. Still, you have options.
Escalate inside the insurer first
Ask for a supervisor review. Request a clear written explanation for delays. Also ask what is needed to move forward.
Use your state insurance department complaint process
When you believe the insurer is mishandling the claim, a complaint can trigger attention. It also creates a formal record.
Consider appraisal or outside experts when justified
Some policies have an appraisal clause for valuation disputes. In complicated losses, an experienced public adjuster or specialized attorney may help.
However, do not rush. First, try strong documentation and written reconsideration. Many disputes resolve there.
Mid-guide skill boost: understand “proof of loss” fast
This concept is scary for beginners. Yet it becomes manageable once you see it explained.
[YouTube Video]: A simple explanation of “proof of loss,” what it is, and why it matters in claim payments.
Next, we will focus on recorded statements and how to protect yourself without being defensive.
Step 10: Recorded statements and “trick question” anxiety
Some insurers request recorded statements. This can feel intimidating. The goal is usually to confirm facts and reduce fraud risk. Yet your words can still be used to narrow coverage.
How to approach a recorded statement safely
Stay calm. Stick to facts. Use your timeline. If you do not remember, say you do not remember. If you need to check, say you will check.
Avoid speculation. Avoid absolute statements if you are unsure.
Ask for the purpose and scope first
Before you begin, ask what the statement will cover. Ask how it will be used. Also ask if you can receive a copy later.
Take notes during the call
Write down questions that felt confusing. Note anything you want to correct later. If you realize you misspoke, correct it quickly in writing.
That correction can be vital.
[YouTube Video]: Practical tips on recorded statements and smart questions to ask before you agree.
Now let’s connect claims skills to the emerging future, because the next wave of claims handling will feel different.
What is changing in claims in 2026 and beyond
Claim handling is becoming more automated, more data-driven, and more model-assisted. This shift can be efficient. It can also create new kinds of errors.
Faster decisions, but new blind spots
Photo estimating, AI-assisted triage, and automated settlement tools can speed payouts for simple claims. That is a breakthrough benefit when the damage is obvious.
However, complex losses can suffer. Algorithms can miss nuance. Models can undervalue unique items. Automated systems can flag “inconsistencies” that are harmless.
Your defense remains the same: clean evidence, clear writing, and consistent timelines.
More external data will influence outcomes
Insurers already use third-party data, property records, vehicle data, and sometimes credit-based insurance scores in underwriting contexts. In claims, more datasets can appear, such as weather verification, satellite images, and prior-loss records.
Consequently, inaccuracies in data can hurt you. Keep your own records so you can challenge errors.
More attention to fairness and consumer protection
As automation grows, regulators are paying more attention to model governance, bias, and unfair practices. That is a promising trend for consumers.
Still, rules evolve slowly. Therefore, your best protection is personal discipline in documentation.
Climate risk will pressure property claims
Severe weather, wildfire exposure, and flooding complexity are rising challenges. When catastrophe events spike, insurers become overwhelmed. Delays become common. Communication quality can drop.
In those high-stress seasons, your organized claim file becomes a competitive advantage.

Step 11: A practical “claim script” you can reuse
You do not need fancy words. You need consistent words.
Your opening message template
Use this structure in email:
Claim number, date of loss, brief facts, immediate actions taken, and what you are requesting next. Add your attachments in a labeled bundle.
This feels professional. It also reduces misunderstandings.
Your supplement message template
When you add new evidence, state what it is, why it matters, and what decision it supports. Keep it short.
For example, “Attached is the contractor estimate and moisture readings. This supports additional drying equipment and wall removal.”
That style is clear and persuasive.
Step 12: How to avoid being underpaid in the settlement phase
Settlements are where people feel relief, then later regret.
Understand depreciation and valuation rules
Some policies pay actual cash value first, then release additional funds after repairs. Others pay replacement cost once proof is shown.
Ask what basis is being used. Request the estimate in writing. Verify depreciation line items.
Track recoverable costs carefully
If the insurer offers recoverable depreciation after repairs, keep all receipts and contractor invoices. Submit them promptly.
Do not sign away rights casually
Some settlement documents include releases. Read them carefully. If you do not understand, ask questions. Consider professional advice for large losses.
This is not fear. It is smart caution.
Step 13: When to bring in help, and how to avoid scams
Outside help can be valuable. It can also be risky.
Signs you may need expert help
If the loss is large, the scope is disputed, the insurer is unresponsive, or you feel overwhelmed, help may be justified.
How to choose help safely
Look for licenses where required. Ask about fees in writing. Avoid anyone promising guaranteed outcomes.
Moreover, avoid pressure tactics. Trust calm professionalism.
Public adjuster vs attorney vs contractor
A contractor repairs. A public adjuster helps with the claim process and valuation. An attorney focuses on legal disputes.
Choosing the right one depends on the problem. In many cases, documentation and negotiation solve it without escalation.
Step 14: The denial response plan that protects your chances
A denial can feel crushing. Yet a denial is not always final.
Ask for the denial in writing with policy language
Request the exact policy provisions used. Ask for the factual basis. Ask what additional evidence could change the outcome.
Build a structured appeal
An appeal should include: a clear summary, a timeline, evidence attachments, and a direct request.
Keep it calm. Keep it factual. Stay persistent.
Use regulators strategically
If you believe the denial violates claim handling rules, a complaint can add pressure. It can also create oversight.
That oversight can be a powerful lever.
A final mindset shift: turn stress into control
Claims feel stressful because they mix money, fear, and uncertainty. You cannot remove emotion. Yet you can build control.
Your control comes from three habits: document early, write clearly, and follow up in writing.
Those habits are not glamorous. They are proven. They also work across home, auto, health, and specialty policies.
You deserve a fair outcome. Moreover, you can dramatically raise your odds by being the most organized person in the file.

Sources and References
- NAIC: How to File a Homeowners Insurance Claim (napia.com)
- NAIC: File a Complaint (NAIC)
- United Policyholders: Claim Help (III)
- Ready.gov: Are You Ready? Preparedness Guide (PDF) (ready.gov)
- FloodSmart: Proof of Loss Guidance (floodsmart.gov)
- Insurance Information Institute: Create a Home Inventory (NAIC)
- NAIC: AI Systems by Insurers Model Bulletin (PDF) (NAIC)
- NAIC: Unfair Claims Settlement Practices Chart (PDF) (NAIC)